Last updated on
Explore the world of post and beam corner joints because understanding their unique types and applications can transform your sustainable building project into a masterpiece.
Key takeaways:
- Accurate joinery ensures structural integrity in post and beam construction.
- Different types of post and beam corner joints offer customization options.
- Mortise and tenon joints are durable and require precise measurements.
- Double mortise and tenon joints distribute load evenly for stability.
- Wedged half dovetail joints and spline and tenon joints provide extra reinforcement.
Importance of Accurate Joinery in Post and Beam Construction

Accurate joinery serves as the linchpin of structural integrity in post and beam construction. Precision-cut joints ensure that the vertical posts and horizontal beams fit snugly, distributing weight evenly and providing the necessary support for the building.
Inaccurate joinery can lead to gaps or misalignments, which compromise the structure’s stability and safety. Furthermore, precise joints reduce the need for metal fasteners, maintaining the aesthetic quality inherent to this traditional building style.
They also allow for the natural expansion and contraction of timber due to humidity changes, ensuring longevity. Moreover, well-crafted joints contribute to the building’s resistance to seismic activity and heavy loads by creating strong connections at corners and intersections.
In summary, meticulous attention to joinery guarantees that the beauty of a post and beam structure is matched by its durability and strength.
Characteristics of Post and Beam Corner Joints
Corner joints in post and beam construction serve as critical points of connection that bear the load of the structure and define its stability. The beauty of these joints lies in their combination of functionality and aesthetic appeal, offering various options for customization.
When considering the design and construction of these joints, several key characteristics emerge:
- Strength and Durability: These joints are engineered to support significant weight and resist environmental stresses over the long term.
- Precision Fit: Each joint must be precisely cut to ensure a tight fit, maximizing contact between beams and posts for optimal structural integrity.
- Wood Selection: The choice of wood affects joint performance, with species like oak and Douglas fir often preferred for their strength and resistance to decay.
- Joinery Techniques: From the simplicity of mortise and tenon to the complexity of dovetailed connections, each technique offers distinct advantages in terms of load distribution and resistance to shear forces.
- Expandability: Some joints are designed to accommodate wood movement due to moisture changes, ensuring the longevity and safety of the structure.
- Aesthetics: Many corner joints are celebrated for their visual appeal, and can be left exposed for a traditional and rustic look.
Mortise and Tenon Corner Joint
The mortise and tenon joint stands out for its enduring strength and utility in woodworking, particularly in post and beam construction. Historically revered for its simplicity and effectiveness, this joinery technique involves two components: the mortise hole and the tenon tongue.
Key considerations in crafting a successful mortise and tenon include:
- Precise Measurements: For a snug fit, ensure the tenon is cut to tightly match the mortise dimensions.
- Secure Fit: Apply wood glue to the tenon before inserting it into the mortise for enhanced bond strength.
- Reinforcement Options: Consider using wooden pegs or dowels to reinforce the joint further, which can be especially beneficial in load-bearing situations.
- Wood Selection: Hardwoods are often preferred for their durability but choose materials compatible with the intended structural needs and environmental conditions.
- Crafting Techniques: Employ chisels, saws, and drills with care to create clean, straight cuts and holes, which are crucial for joint integrity.
Understanding these points helps in executing a mortise and tenon joint that not only bears the weight of structural components but also withstands the test of time in post and beam architecture.
Step-by-Step Construction of Mortise and Tenon Corner Joint
Begin by measuring the dimensions of your timber meticulously, as these will dictate the size of the mortise (the cavity) and the tenon (the projecting piece). Next, mark out the exact points for drilling or chiseling on both the post and the beam to ensure the marks are precise and clear.
Carefully chisel out the mortise hole in the post, working gradually to avoid splitting the wood. If necessary, use a drill to start the hole but finish with chisels for a clean fit.
Fashion the tenon on the end of the beam, tapering it slightly to fit snugly into the mortise. Ensure the shoulders of the tenon sit flush with the face of the post for maximum contact and strength.
Dry-fit the tenon into the mortise to check for a tight, secure fit. Make any final adjustments before applying wood glue for additional bond strength.
Once the glue is applied, insert the tenon into the mortise, using a wooden mallet to tap it home if necessary, ensuring it’s fully seated.
Finish by securing the joint with wooden pegs or dowels, driven through aligned holes in the post and tenon, locking the joint in place as the pegs expand within the wood.
Ensuring Strength and Stability in Mortise and Tenon Joints
To maximize the durability of mortise and tenon joints, follow these guidelines:
- Proper Sizing: Ensure the tenon is approximately one-third the thickness of the post for optimal strength. This proportion balances the structural integrity of both elements.
- Tight Fit: Craft the joint to be snug but not excessively tight. A tenon that fits well without force maintains its hold, while overly tight joints can split the timber.
- Wood Selection: Use dry, stable wood to prevent future shrinkage or expansion that could compromise the joint. Hardwoods often provide superior strength for these connections.
- Orientation: Align the grain of the tenon parallel to the grain of the mortise. This reduces the risk of splitting and enhances the connection.
- Glue Selection: Use an appropriate wood adhesive to secure the joint further. Consider weather conditions, as some glues may degrade with humidity and temperature changes.
- Seasoning the Timber: Allow the wood to acclimate to the local environment before making cuts. Dimensional changes due to moisture content can affect the fit over time.
- Pegs or Dowels: Add wooden pegs to lock the tenon in place, which also allows for wood movement without weakening the joint. Pegs offer additional mechanical strength to the joint.
- Consistent Craftsmanship: Ensure accuracy in measuring and cutting. Precision in making these joints is crucial for both the appearance and structural integrity of the framework.
Double Mortise and Tenon Joint
Utilized to enhance stability and weight distribution, the double mortise and tenon joint typically features two separate tenons emerging from a single timber end, fitting into corresponding mortises on an adjoining beam. This twin design more evenly distributes mechanical stress and is often found in areas subject to heavy loads or where the post may support complex structures above.
Key points about a double mortise and tenon joint:
- Distributes Load Evenly: The dual tenons spread out stress along the post, reducing the likelihood of shear failure.
- Increased Surface Area: With more surface contact between the beams, this joint offers improved adhesive bond strength and resistance to racking.
- Complex to Craft: Creating two precise tenons and mortises takes careful measurement and skilled carpentry, as misalignment can compromise the joint’s integrity.
- Versatile Application: This joint is suitable for various configurations, including standard post-to-beam or more complex intersections like a scarf joint within a longer beam.
In practice, ensuring exact cuts and proper alignment during assembly is crucial for the joint’s effectiveness. Regular inspection can help detect any signs of wear or movement over time, ensuring the joint maintains its structural role in post and beam construction.
Applications for Double Mortise and Tenon Joints
Double mortise and tenon joints have several practical applications in timber framing and woodworking, providing enhanced strength and stability where larger and heavier structural elements come together. This type of joint distributes stress over two points, reducing the likelihood of joint failure under heavy loads.
- Support for Heavy Loads: The double connection points effectively manage the heavier weights often encountered in large-scale construction projects, such as the framing of barns or commercial buildings.
- Long-Spanning Beams: They are ideal for intersections involving long-spanning beams, where a single tenon might not provide sufficient holding power.
- Resistance to Twisting Actions: The two tenons resist the twisting forces that might occur in high-wind areas or in structures that experience frequent movement or use.
- Enhanced Aesthetics: In spaces where the beauty of wood joinery is a design feature, double mortise and tenon joints provide a symmetrical and harmonious look.
These double connections require precise craftsmanship, but the payoff is a robust and reliable framework capable of enduring the test of time and stress.
Through Tenon With a Wedge
Crafting a through tenon with a wedge involves cutting a tenon on the end of a horizontal beam to pass through a mortise in an upright post. The tenon protrudes from the opposite side of the post, where it’s secured using a wedge. This ancient technique is revered for its mechanical strength and the sheer elegance it brings to joinery.
When the wedge is driven in, it forces the tenon to expand within the mortise, creating a tight fit that is resistant to pulling out. This method also allows for some flexibility within the structure to accommodate natural wood movement over time.
The key points to consider in this method are precision in cutting the mortise and tenon to ensure a snug fit and the use of quality materials for the wedge to avoid weakening the joint. Also, careful alignment during assembly is crucial to make sure the structural integrity of the building is maintained.
Installation Process of a Through Tenon With a Wedge
When constructing a through tenon with a wedge, precision is key. Start by cutting a tenon at the end of the beam that will pass all the way through a corresponding mortise hole in the upright post. Ensure the tenon’s width is slightly less than that of the mortise for a snug fit.
Shape the tenon’s end into a wedge, tapering it slightly for easier insertion. At the mortise exit point, widen the hole to create a kerf that can accommodate the wedge shape. After inserting the tenon through the post, secure it by driving a hardwood wedge into the kerf at the protruding tenon’s end. This action expands the tenon within the mortise, locking it in place.
For additional strength, cut the mortise with a slight draw, angling inward as it goes through the post. This angle will pull the joint tightly together when the tenon is wedged. Remember to use a mallet when inserting the wedge to avoid splitting the wood.
Apply glue to both the tenon and wedge before assembly to enhance the joint’s durability. Regularly check and re-tighten wedges if necessary, as natural wood movement may cause them to loosen over time.
Wedged Half Dovetail Tie Beam Tenon to Post Timber Frame Joint
Fabricating a wedged half dovetail joint demands precision and craftsmanship, as the angled dovetail cut on the tie beam locks into the post, resisting tension forces that might pull the tie beam away.
Here’s how this works:
- The “dovetail” portion of the joint refers to the trapezoidal shape created at the end of the tie beam, resembling a dove’s tail. This shape fits snugly into a corresponding cutout in the post.
- The “wedged” element is introduced after inserting the dovetail into the post. A wooden wedge is driven into a cut made in the tenon, expanding it against the sides of the mortise for a tight fit.
- The “half” descriptor indicates that the joint only shows on one side of the post, allowing for a clean look on the other side, which might be visible in the finished structure.
- As this joint manages both horizontal and vertical loads effectively, it is typically used in the corners of timber frames where strong connections are vital.
- During assembly, care must be taken to align the components properly, as the angled cuts require a precise fit. Adjustments can be challenging once the joint is partially assembled due to its interlocking nature.
By incorporating these nuances, the wedged half dovetail joint ensures stability and enduring strength in a timber frame structure.
Fabrication Techniques for Wedged Half Dovetail Joints
Crafting a wedged half dovetail joint begins by marking the dovetail on the end of the tie beam, ensuring it tapers so the joint can be tightened and secured with a wedge. The corresponding mortise must be cut into the post with careful precision to achieve a snug fit.
1. Create Dovetail and Mortise: Use a saw to cut along the marked lines of the dovetail on the tie beam, and chisel out the waste wood carefully. For the post, chisel out the mortise that matches the beam’s tail shape, but slightly oversized to accommodate the wedge.
2. Wedge Fabrication: The wedge, generally made from a durable hardwood, must fit the dovetail’s taper precisely. It should allow for a tight joint when inserted but not split the beam’s tail.
3. Dry Fit and Adjust: Always perform a dry assembly to check the fit before final installation. Make fine adjustments to ensure the tie beam slides into the mortise easily, with minimal gaps.
4. Assembly: Slide the tie beam’s tail into the post’s mortise, and insert the wedge. The wedge should be driven in until the joint is tight and immovable, creating a strong, interlocking connection.
5. Maintenance: Over time, the wood may dry and the wedge may loosen. This design allows for easy retightening, ensuring the structure’s longevity and safety.
Timber Frame Corner Joint With Spline and a Tenon
Producing a sturdy and precise corner joint with a spline and a tenon combines the traditional tenon’s strength with the additional reinforcement of a spline. This joint provides exemplary resistance to racking – a common force that can stress the connections in timber frame structures.
Here’s a quick breakdown of the process and its benefits:
- A tenon is extended from the end of one timber and fits into a mortise that is chiseled out of the adjoining post.
- Along the face of the joint, a thin, elongated slot – or the spline mortise – is created to align with a corresponding slot across the joint on the adjoining timber.
- The spline, a separate piece of wood, is inserted into these slots, bridging the two pieces of timber.
- The spline adds extra surface area for glue application, significantly enhancing the joint’s mechanical strength.
- This method not only fortifies the joint but does so with minimal visual impact, maintaining the clean aesthetic lines typical of timber frame designs.
With this joint, the structure benefits from the proven reliability of mortise and tenon joinery, while the spline acts as an internal brace, discreetly boosting the longevity and resilience of the connection.
Crafting a Timber Frame Corner Joint With Spline and a Tenon
A timber frame corner joint with a spline and a tenon creates a robust connection that beautifully showcases the craftsmanship inherent in post and beam construction. This joint method combines the classic tenon—a protruding wood piece that fits snugly into its corresponding mortise (cut-out)—with a spline, which is a thin strip of wood that bridges two separate joint pieces to enhance stability and strength.
Here’s how the joint is achieved:
- Precision Cutting: Craft a tenon on the end of one beam and a matching mortise on the other post or beam you wish to join. Precision is key so the tenon fits snugly.
- Spline Slot Creation: Cut a spline slot—parallel to the mortise and tenon joint—on both the post and the tenon-end of the beam. Ensure the slots align when the tenon is inserted into the mortise.
- Spline Fabrication: Cut the spline itself from a durable wood species to withstand shear and tensile forces.
- Assembly: After dry fitting the tenon and spline to confirm a good fit, apply adhesive to the tenon, mortise, and spline. Insert the tenon into the mortise, then slide the spline into its slot, locking the joint.
- Clamping and Setting: Use clamps to secure the assembly while the adhesive sets, ensuring a tight fit and no movement.
This approach marries traditional joinery with an added layer of reinforcement. When executed well, it provides a joint that is not only strong but also has an appealing aesthetic, often leaving the craftsmanship exposed to view in the final structure.
Post and Beam Knee Brace Connection
Knee braces play a crucial role in reinforcing the stability of post and beam structures against lateral forces, like wind or seismic activity. The elegance of these diagonal supports lies in their ability to distribute loads across a broader area, reducing stress on the main joint.
To secure a knee brace connection, the following points are essential:
- Accurate cuts must be made on both the knee brace and the post or beam to ensure a snug fit. This often requires precision craftsmanship and careful measurements.
- Typically, the brace is joined to the post and beam using mortise and tenon joinery, sometimes reinforced with wooden pegs or metal fasteners for added support.
- The angle at which the knee brace meets the post and beam is usually 45 degrees. However, this may vary depending on specific design requirements or aesthetic preferences.
- It’s important to select the appropriate timber for knee braces, considering both the strength of the wood and its resistance to outdoor conditions if the structure is exposed to the elements.
By adhering to these critical aspects, knee brace connections contribute significantly to the longevity and integrity of post and beam construction.
Methods of Securing Knee Brace Connections
Knee braces play a crucial role in reinforcing post and beam structures, adding stability against lateral forces. Traditional methods include pegged mortise and tenon joints often reinforced with wooden dowels or pegs, marrying the aesthetics of classic craftsmanship with structural integrity.
Contemporary options feature metal fasteners, such as screws and bolts, for a robust connection, especially in areas prone to seismic activity. Dovetail knee braces ensure a tight interlocking fit, using the wood’s own geometry to secure the joint, reducing the need for metal hardware, which synergizes well with natural building design principles.
For additional reinforcement in heavy-duty applications, steel gusset plates can be incorporated, either exposed or concealed, to distribute stress across a broader area of the wood elements. Each method demands precision in measurement and cutting to ensure a snug, secure fit that is both functionally sound and visually pleasing.
FAQ
How do I join post and beam?
To join post and beam, place a suitable metal beam bracket on top of the post and fasten it by driving wood screws or structural nails through the bracket holes into the post.
What are the joints for post and beam construction?
In post and beam construction, the main joints used are shouldered mortise and tenon, where carrying beams shoulder one inch onto posts through a tapered cut, and are secured with one-inch pegs.
What are the different types of post and beam connections?
The four different types of post and beam connections are Standard, Post to Base, Multi-beam connectors, and Diagonal connectors.
How does weather affect the durability of post and beam joints?
Weather, particularly moisture and temperature fluctuations, can lead to the degradation of post and beam joints, causing them to warp, rot, crack or fail.
What are the best materials for post and beam construction?
The best materials for post and beam construction are durable, strong woods like Douglas Fir, Southern Yellow Pine, or Cedar, as well as steel for increased structural support.
Can post and beam construction be used for sustainable building?
Yes, post and beam construction can be leveraged for sustainable building as it efficiently utilizes raw materials and reduces construction waste.
Related reading:

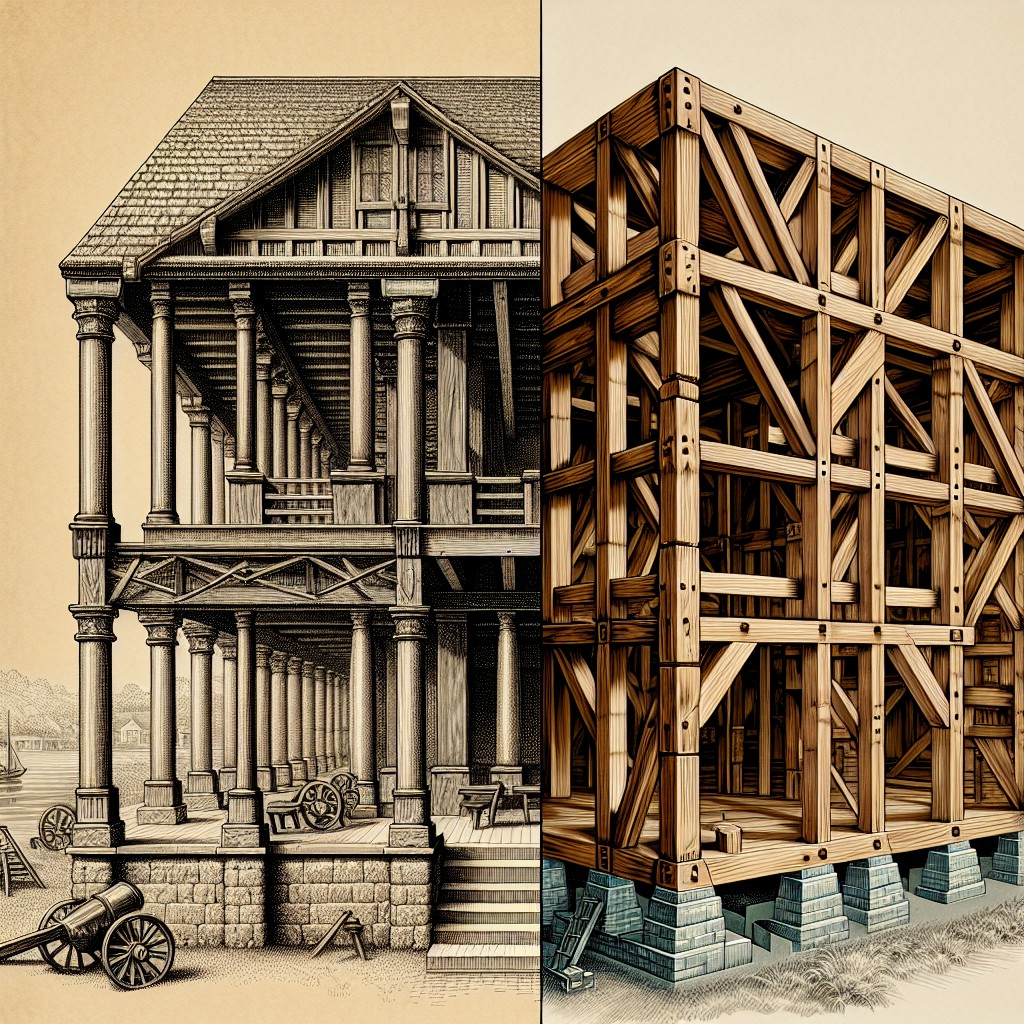


Table of Contents